Making developer requests via a GraphQL client
This page is focused on access to the developer GraphQL API. See the documentation for a specific endpoint for information on how to access that endpoint.
In order to interact with GraphQL you will likely choose to use a GraphQL client, rather than making direct HTTP requests. There are many different clients available as independent software, or as extensions to existing browsers or IDEs. Below we describe a few common clients and how they are configured to access Totara's GraphQL APIs.
Postman
There are a few ways to use Postman, but our recommendation would be to create a collection for your Totara API requests.
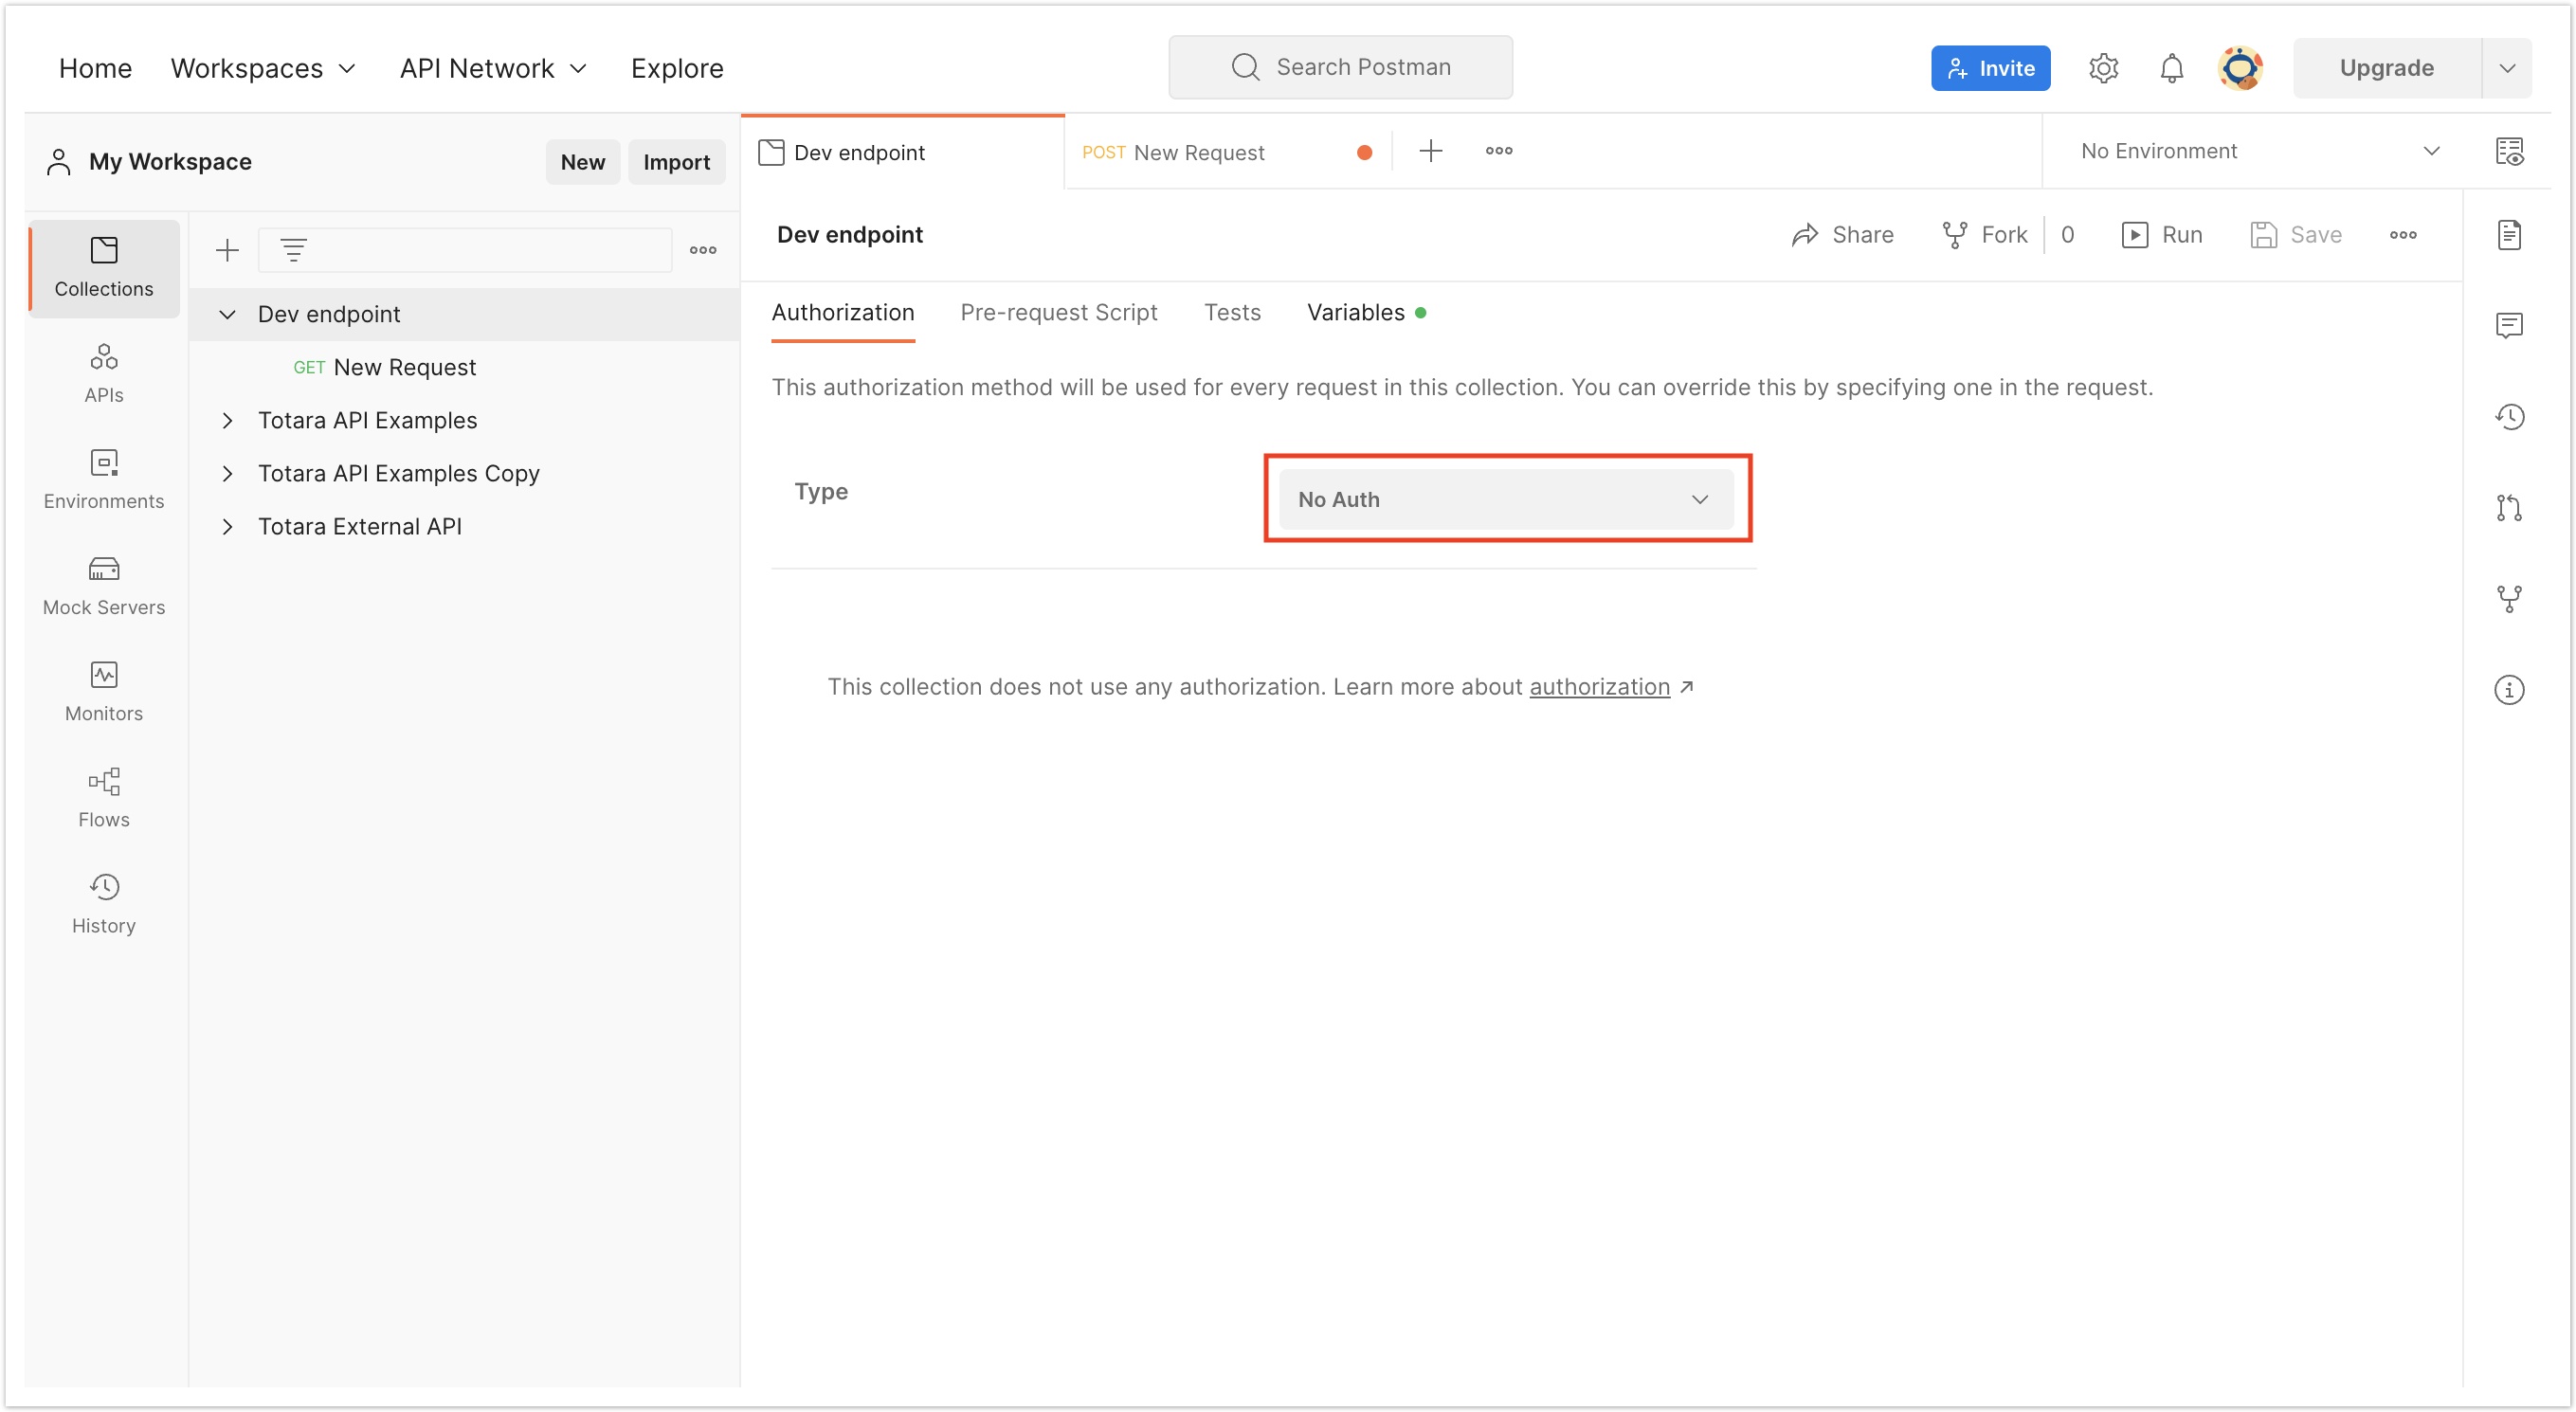
Create a collection with Authorization set to No Auth:
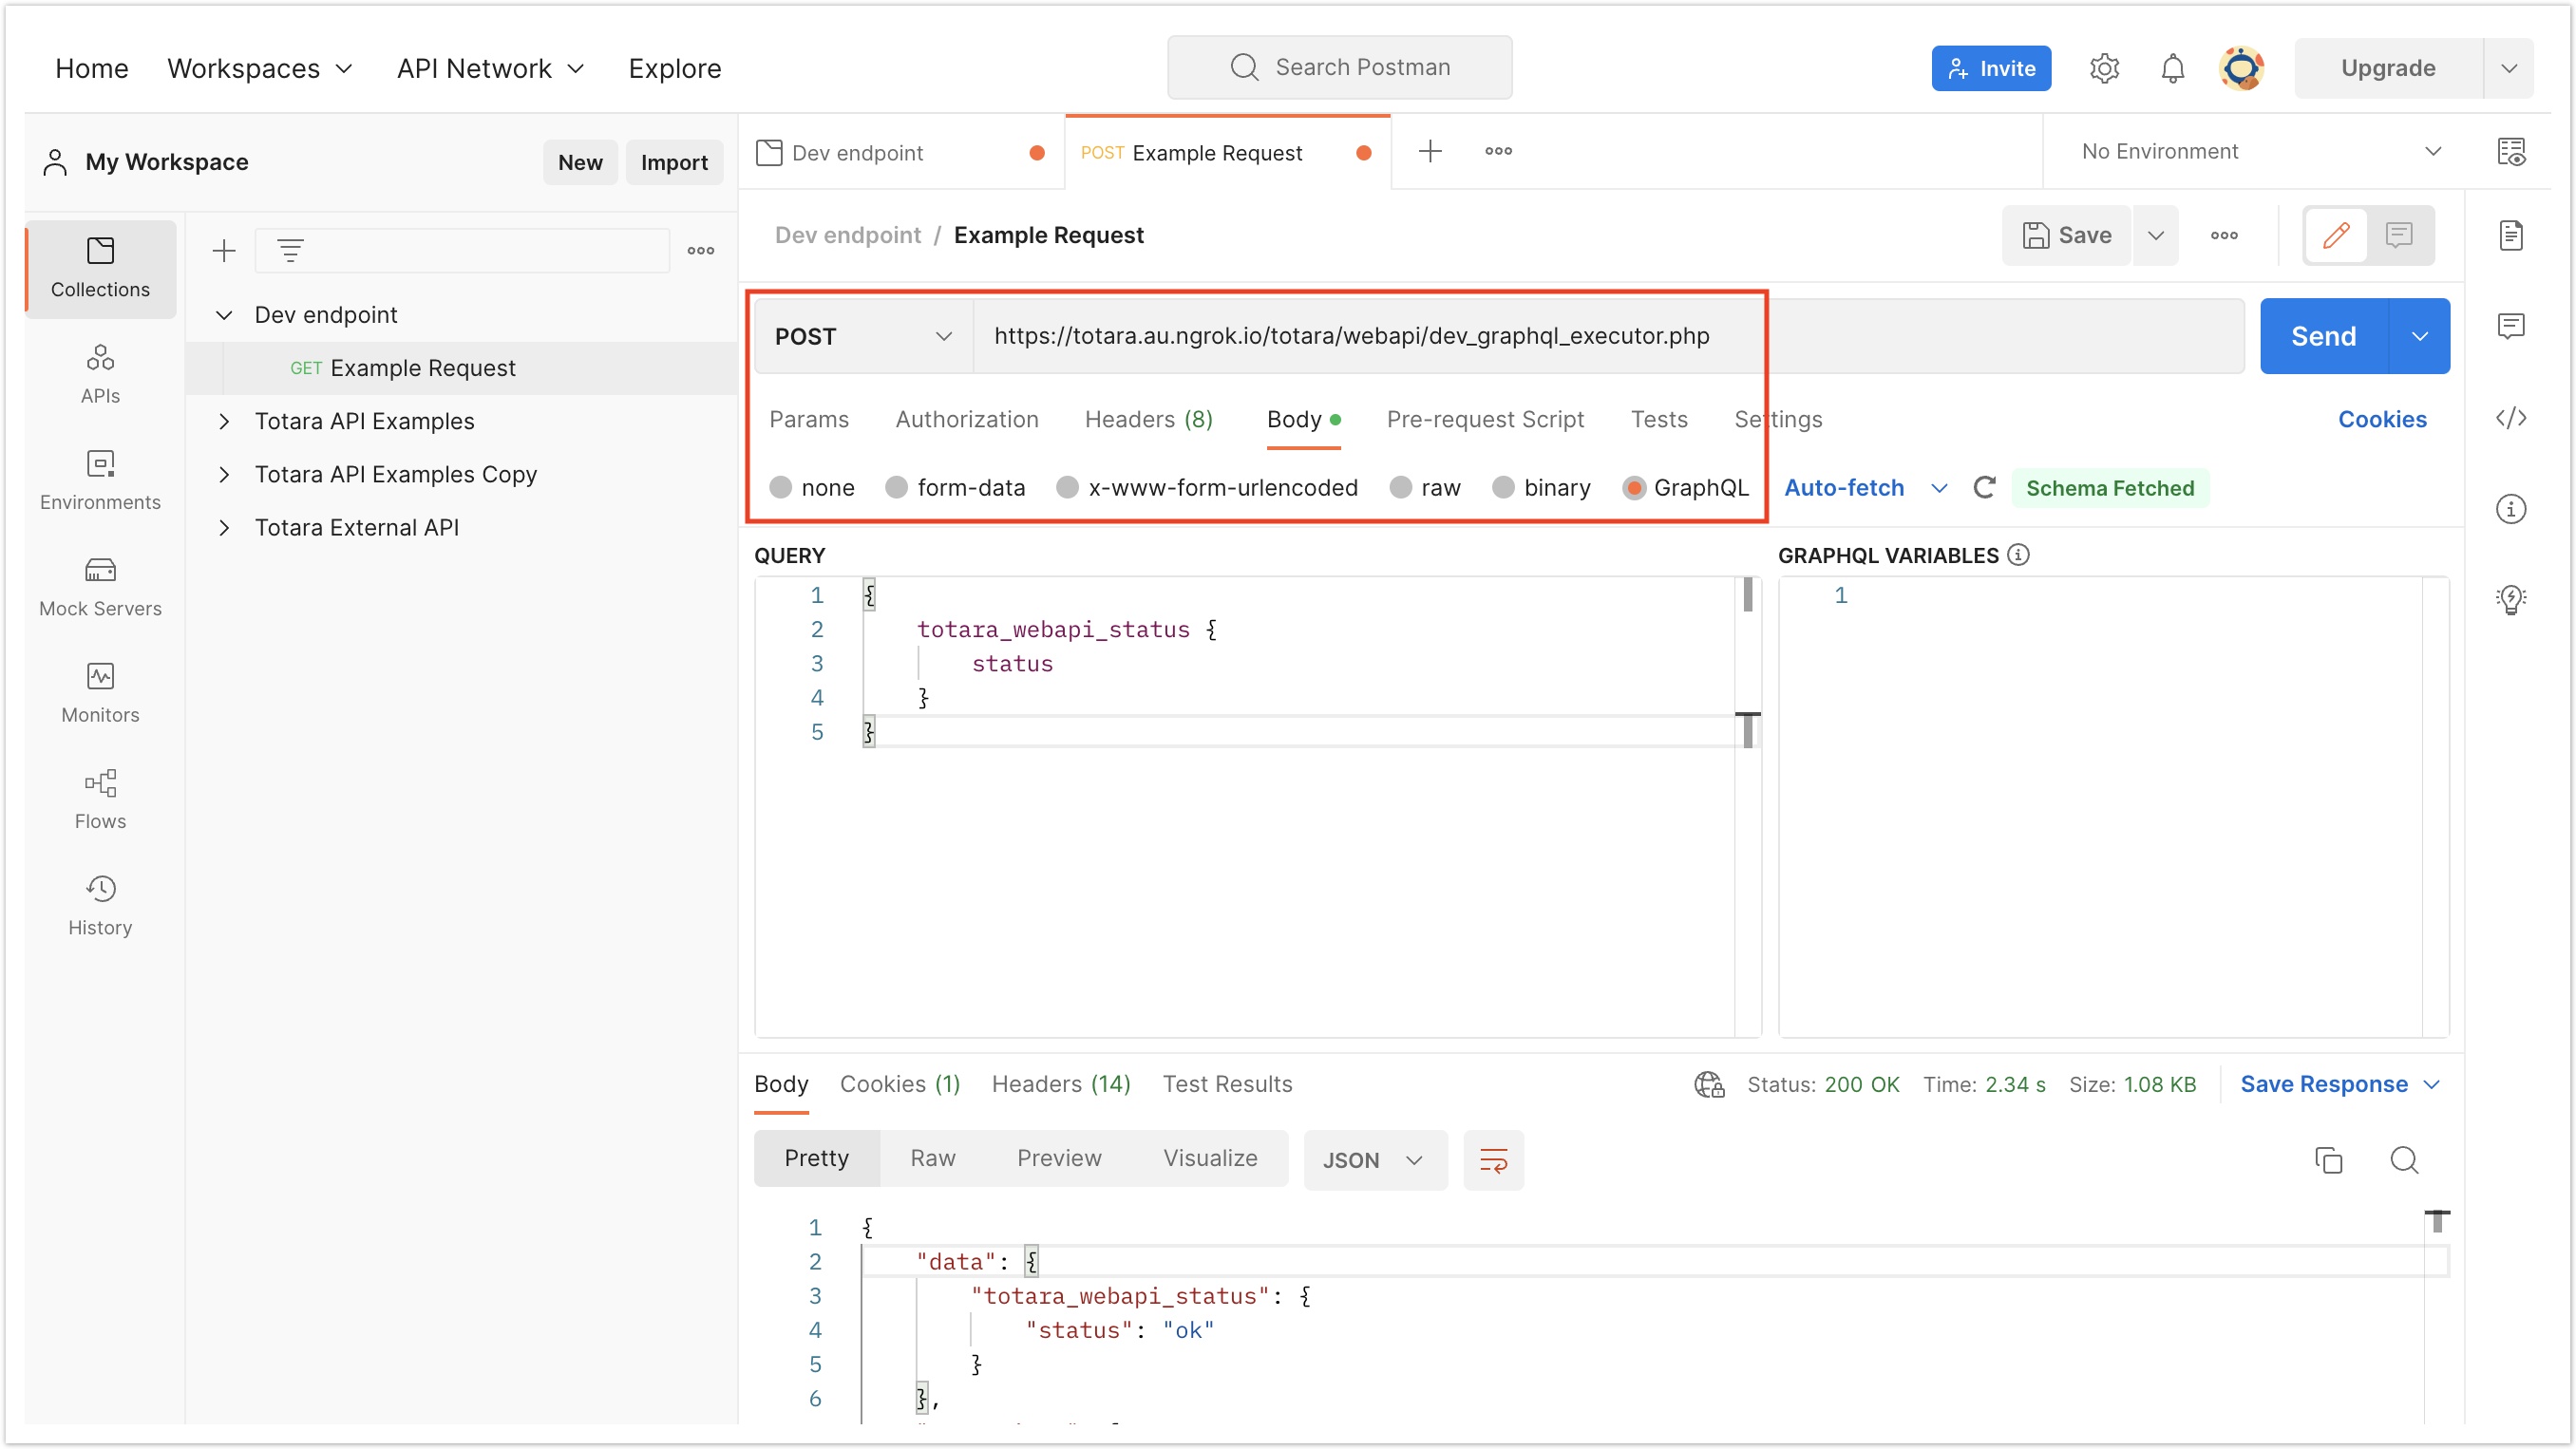
Create a request and set as follows:
- Request URL: https://YOUR-SITE-URL/totara/webapi/dev_graphql_executor.php
- Request Method: POST
- On Body tab, select GraphQL
Ensure YOUR-SITE-URL matches your site's wwwroot.
Next, click Cookies (the blue link on far right), and select Add Cookie:
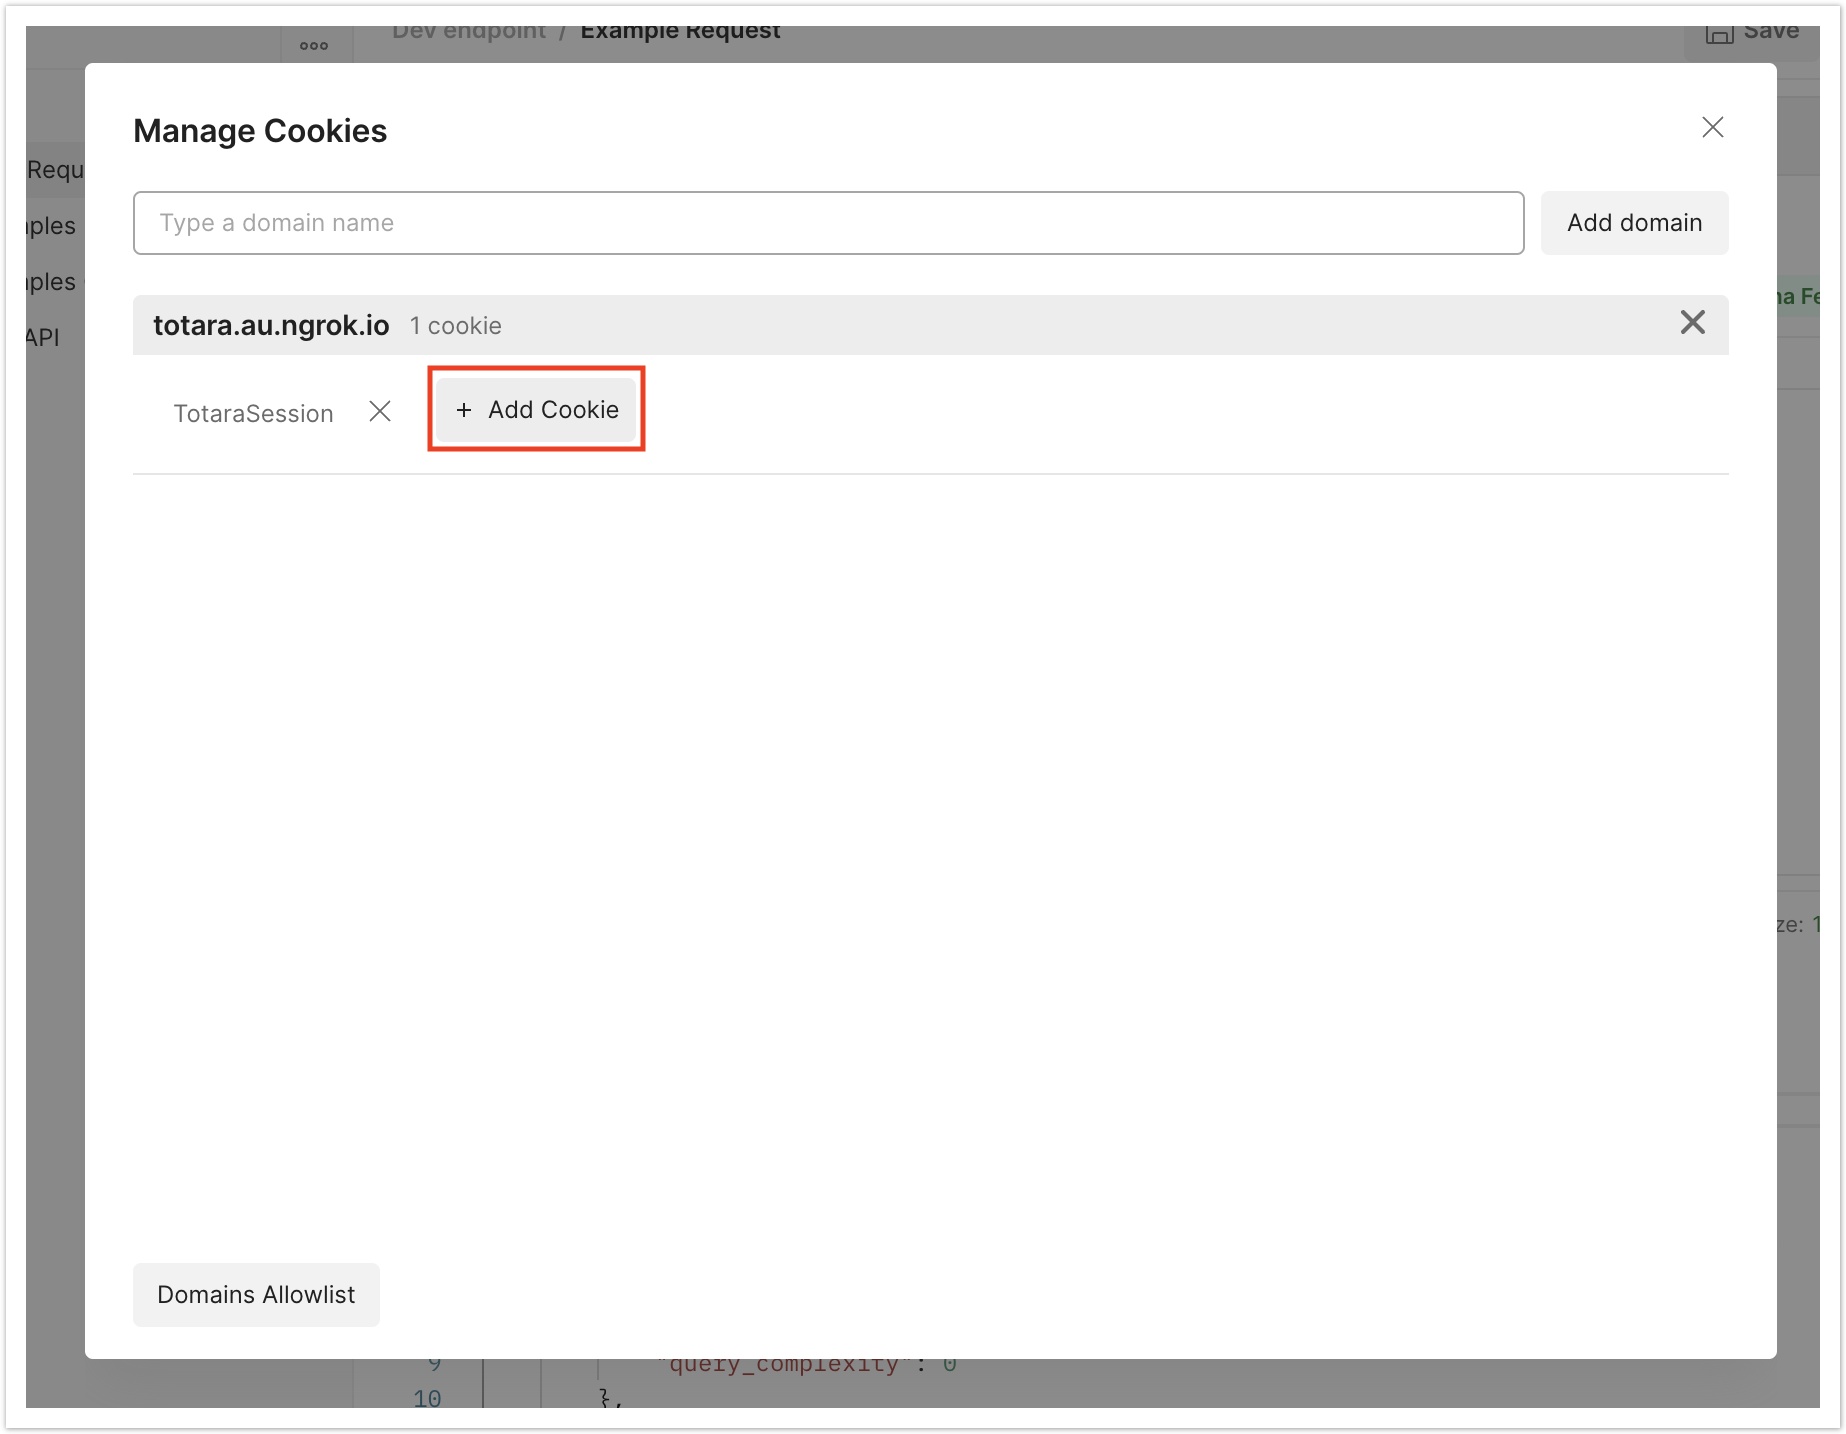
You will need to specify the name and value for the Totara session cookie:
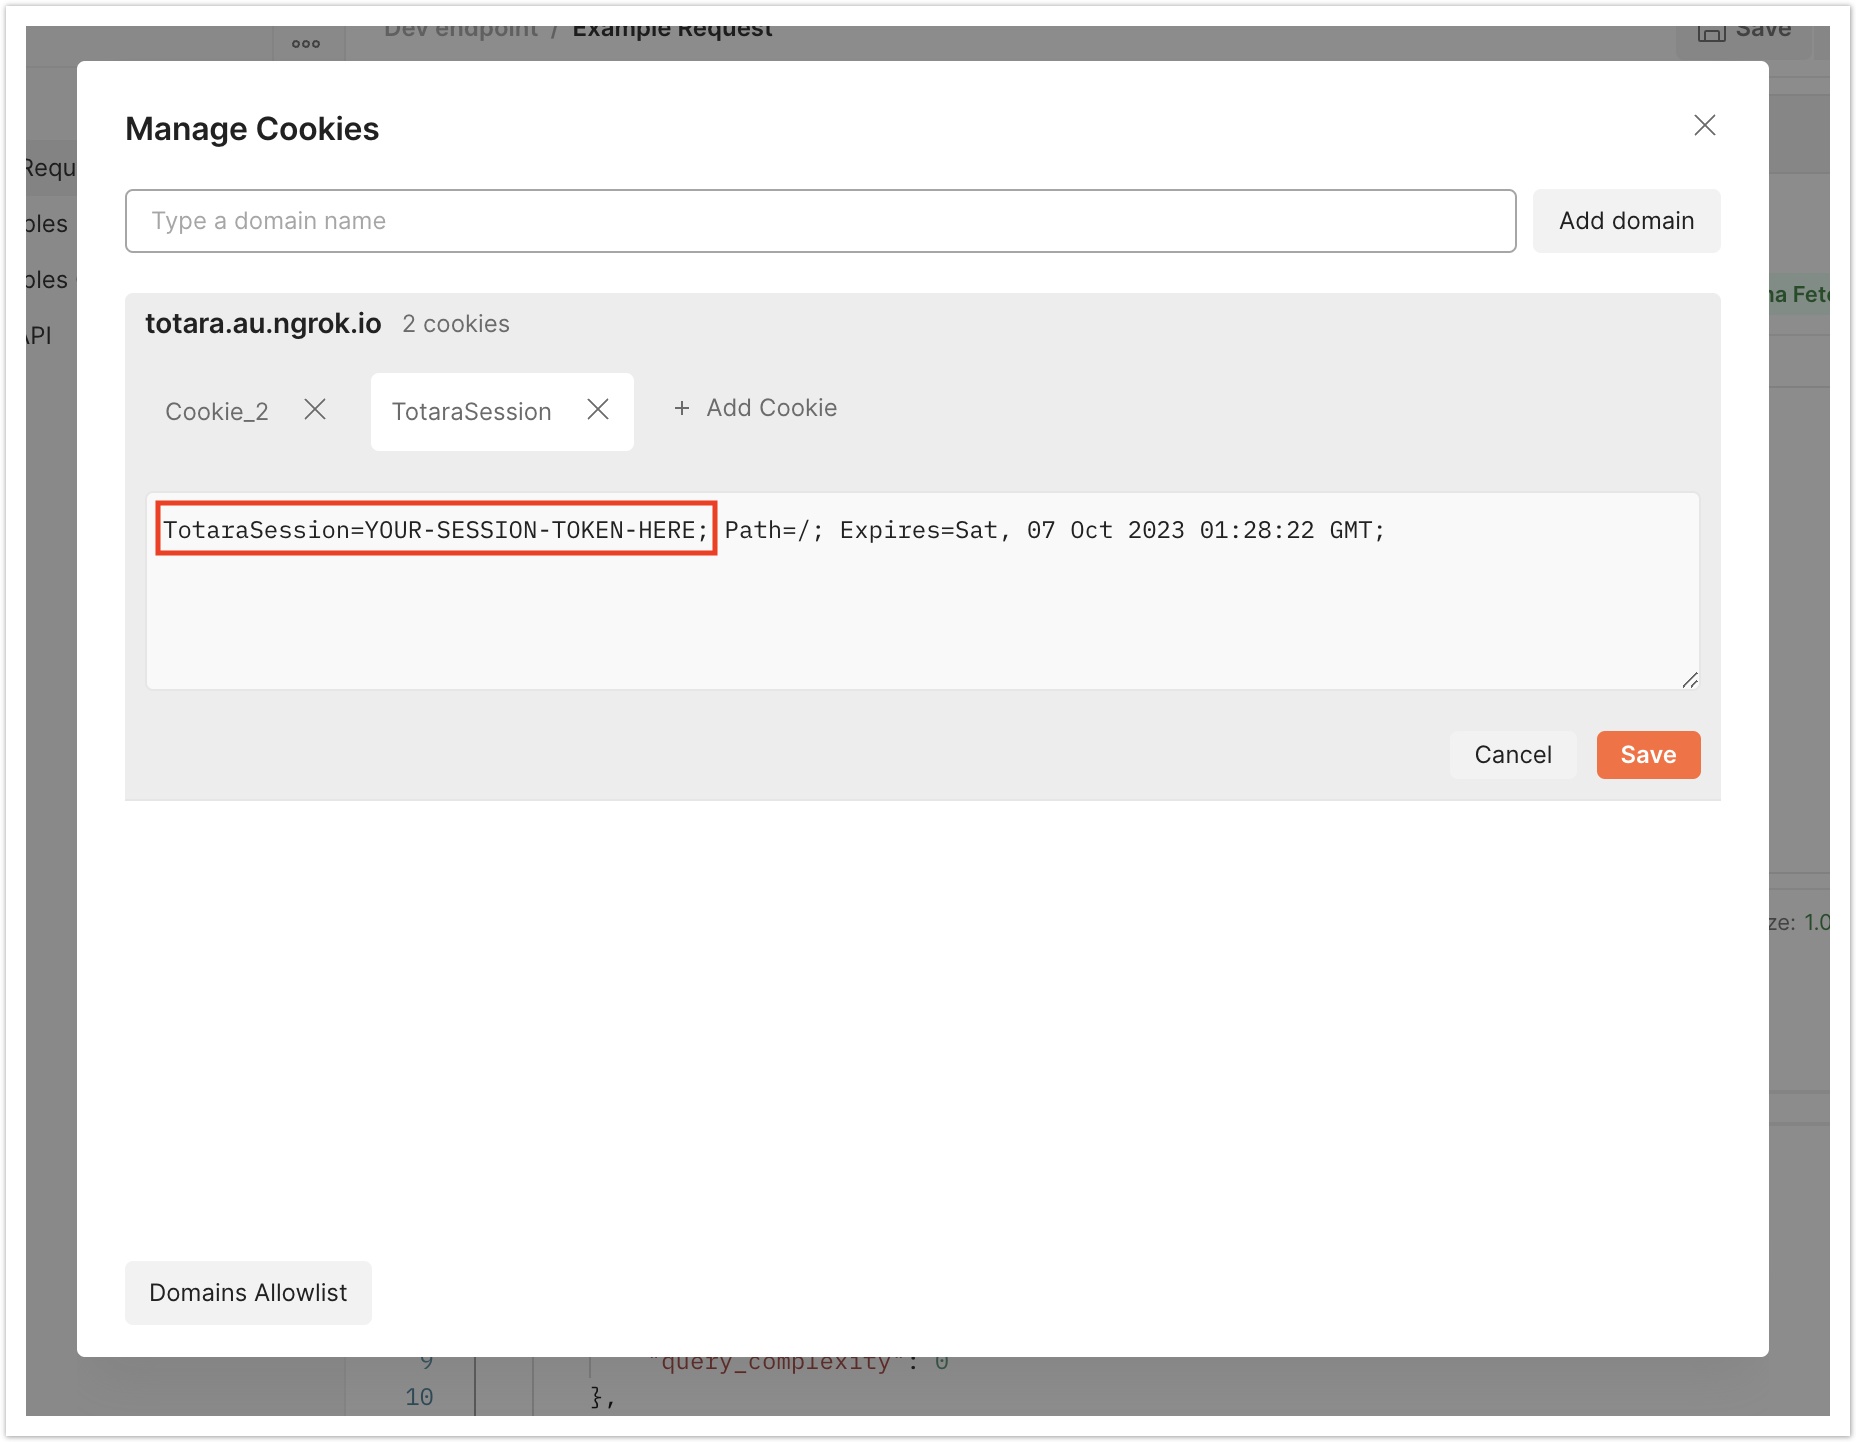
The session cookie value can be obtained by logging in as the user you want to use (via the same URL as you entered above). Next, open your browser's developer tools and locate the Totara Session cookie. For Google Chrome, this is under Application > Storage > Cookies. Normally you are looking for the value of the TotaraSession cookie:

If you have customised the session cookie prefix under Quick-access menu > Server > Session handling > Cookie prefix, it may have a different name. Similarly, you might have multiple cookies on the same server, so look for the one with the path that matches the site's URL.
Once you've saved the cookie, you can then enter a query and variables into the page and click Send to make the request. Schema auto-completion should be working as you write the query and you should get results in the bottom window like this:

When the logged-in user's browser session expires you will need to repeat the steps above to enter the new TotaraSession cookie value.
PHPStorm
GraphQL integration within PHPStorm is achieved via the JS GraphQL plugin. Install this plugin via Preferences > Plugins:

PHPStorm GraphQL access is configured by a new file in the project's root folder. Create a file called .graphqlconfig in the top-level root folder (the one that contains server and client directories).
Add the following statement to your site's config.php. This will put GraphQL into developer mode - this should not be done on production sites.
define('GRAPHQL_DEVELOPMENT_MODE', true);
If your site is publicly accessible then you should prevent downloads of the .graphqlconfig file in your web server configuration. That is because this file (which we will create next) will contain secret information that could be used to make API requests.
Now create a .graphqlconfig file with the following content:
{
  "extensions": {
    "endpoints": {
      "Default GraphQL Endpoint": {
        "url": "[siteurl]/totara/webapi/dev_graphql_executor.php",
        "headers": {
          "user-agent": "JS GraphQL",
          "Cookie": "TotaraSession=[copysessionidfromactivebrowsersession]"
        }
      }
    }
  }
}
Ensure [siteurl] matches your site's wwwroot. To obtain the value that should go in [copysessionidfromactivebrowsersession], visit your site and log in as a user. Next, open your browser's developer tools and locate the TotaraSession cookie. For Google Chrome this is under Application > Storage > Cookies. Normally you are looking for the value of the TotaraSession cookie:
If you have customised the session cookie prefix under Quick-access menu > Server > Session handling > Cookie prefix, it may have a different name. Similarly, you might have multiple cookies on the same server, so look for the one with the path that matches the site's URL. Copy the long hexadecimal value into your .graphqlconfig file.
Once the .graphqlconfig file has been created, open the GraphQL tab and add a new schema configuration:

Specify the folder that contains the .graphqlconfig file:

You should end up with a new endpoint and some information about the schema (types, interfaces, etc.).
You can use the GraphQL plugin in a number of ways:
- Open any .graphql or .graphqls file and get auto-completion and syntax highlighting based on the API schema
- Execute .graphql files, including support for passing variables and easily browsing the results
- Execute arbitrary queries via new .graphql files or scratch files
The play icon allows you to execute a query against the specified endpoint. The V icon allows you to provide a JSON structure containing variables that will be used as query arguments. Results will appear in the panel below:

Queries will be executed as the user whose session cookie was used in the .graphqlconfig file configuration step from before.
Altair
Altair is a GraphQL client available on multiple platforms, including as a Google Chrome extension in the Chrome store.
Because Altair is a web-based tool, cookies from other browser tabs will be available within the tool, so you should be able to authenticate simply by logging in to the Totara site via the UI in another tab.
After installing the Chrome plugin, an extension icon will appear next to the URL bar:

Clicking it will open the client:

To use the client:
Add the following statement to your site's config.php. This will put GraphQL into developer mode - this should not be done on production sites.
define('GRAPHQL_DEVELOPMENT_MODE', true);- Open your site in your browser and log in as the user you want to access the API as.
Enter the following POST request in the Send request bar at the top:
https://yoursite.example.com/totara/webapi/dev_graphql_executor.php
To test queries are working you can enter the following query:
query{
  core_lang_strings(lang: "en", ids: ["totaralearn,totara_core"]) {
    identifier
    component
    string
  }
}
This should return something like this:
{
  "data": {
    "core_lang_strings": [
      {
        "identifier": "totaralearn",
        "component": "totara_core",
        "string": "Totara Learn"
      }
    ]
  }
}
You can also test authentication is working by running a user-specific query and make sure it returns data belonging to the current logged-in user:
query {
  core_my_courses {
    id
    fullname
  }
}
You should also find that you can use auto-completion when modifying queries.
Clicking the Docs button should open a panel with the current schema documentation. If not, try clicking the Reload Docs button:
